
You can use Blender to create model aircraft and scenery for use in your simulation. The latest version of Blender can save your models in the preferred gltf/glb format. Learning Blender can be a challenge. Fortunately, there a lot of great tutorials online, some of which discuss how to create model aircraft. There is also an excellent set of books, published by Witold Jaworski, which you can use to create simple or "museum quality" aircraft.
Blender is a free program that you can use to create and animate 3D models.
If you have not already done so, you should download and install the latest version of Blender. To download and install the latest version of Blender, go to Blender.org. The current version is Blender 2.9.
You can customize your workspace in Blender. Here is the version that I use.
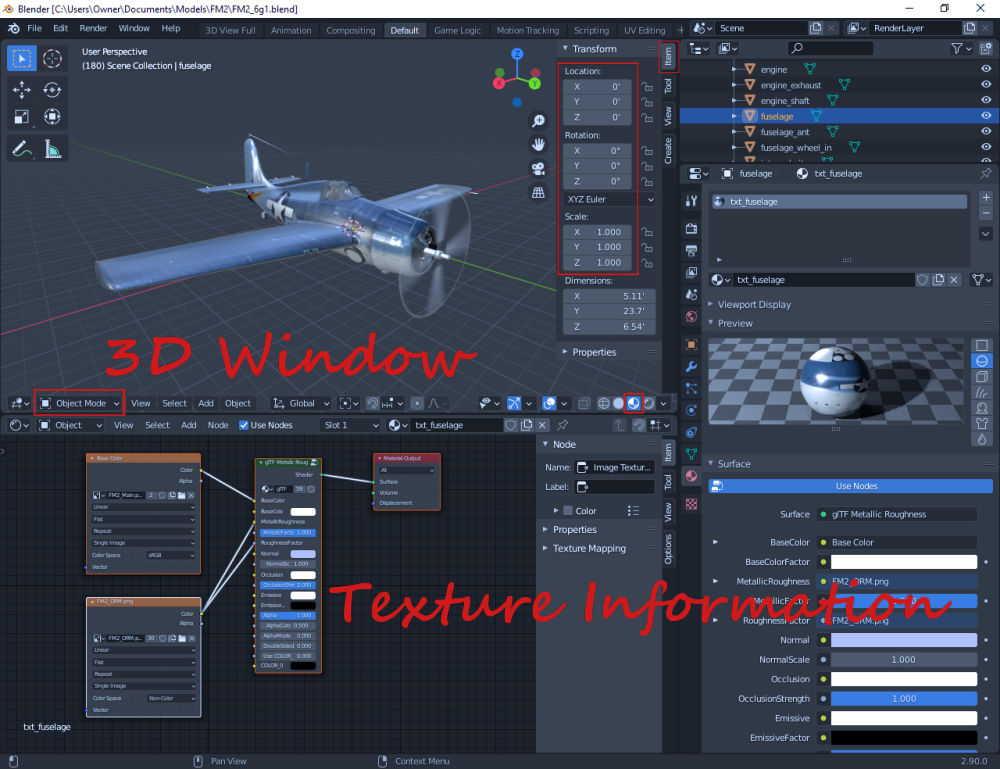
You will create your model in the 3D window.
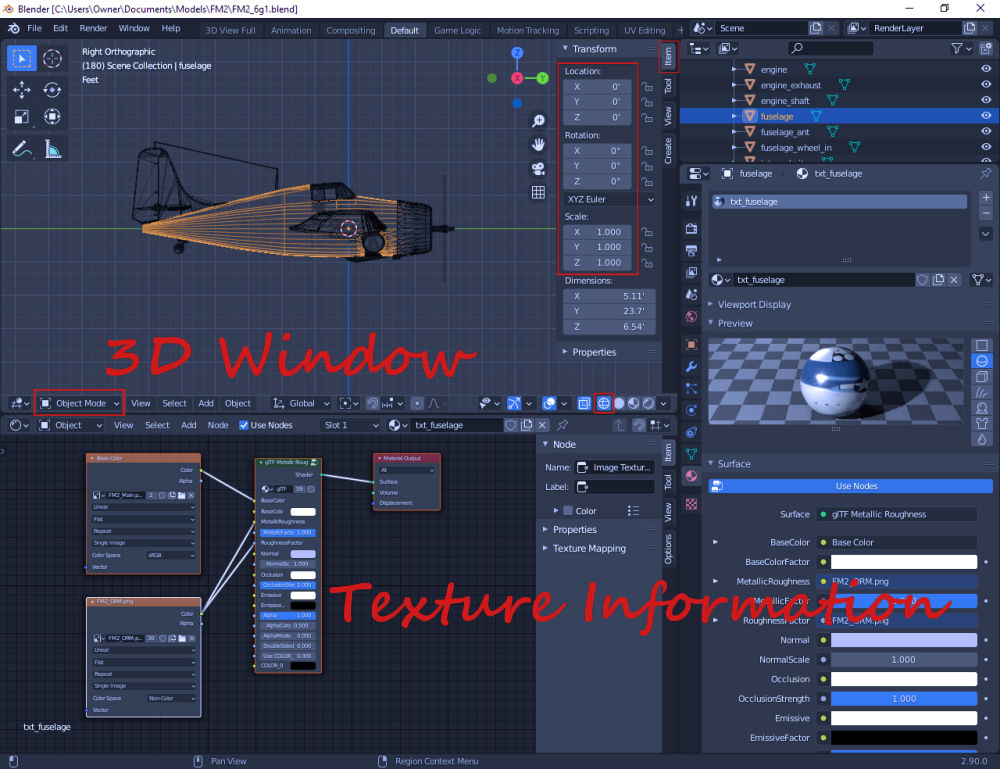
You will be creating the model in the 3D window. If you want to rotate the object from different angles, you can hold down the mouse wheel and move the mouse. Holding down the shift key, will allow you to move the object laterally. You can use the mouse wheel to zoom in and out. You can view the object from the top, side, bottom, front, etc. using the corner keypad keys (1, 3, 7, 9). The can use the side keypad keys (2, 4, 6, 8) to rotate the object around an axis - 12 keypresses equal 180 degrees. You can toggle between the ortho and perspective view by pressing the center key (5). You will generally want to be in the ortho view when editing parts.
The object view is the default view. You can view objects as wireframe, solid and textured objects by pressing the appropriate buttons in the lower right of the view pane.
You can edit parts in this view. Note that the YZ axes are different than normal. The vertical axis is Z (rather than Y) and the depth axis is Y (rather than Z). If you forget, you can look at the indicator in the upper right of the screen which shows the direction of the axes.
To move parts, press G. If you want to move directly along an axis, press GX, GY or GZ. A line will appear, showing the axis you will be moving along. Use the mouse to move the object and click the mouse button when you are done. If you want to move very small amounts, hold down the shift key while moving.
You use similar commands to rotate (R) and resize objects (S). You can constrain the action to a specific axis, also press X, Y or Z. When rotating, I generally use R to approximate the rotation and then enter the exact value in the data fields.
The part will be rotated or resized relative to the axis for the part. So if the axis is in a odd location, you will see some odd results. You can center the axis to the part.
If you do not like what you have done, press CTRL-Z to undo the action (you will use that a lot). If you want to make the change permanent, you can apply that action to the object.
I would also suggest that you save your work fairly often and that you frequently try exporting your object. In some cases, you will make a few changes and find that exporting the object yields a huge error list. You can try entering CTRL-Z to undo the changes one at a time and try exporting until the error list disappears. Save that version. However, there are times when Blender malfunctions and kicks you out, so that you cannot use CTRL-Z. In these cases, you have to load your latest version and work forward.
 Side view of aircraft object in wireframe view.
I generally begin creating a model using the default shapes (meshes) that a built into Blender. My favorite is the "UV Sphere", which you can use to create almost any shape, including the fuselage and wings. As an alternative, you can use a cylinder for the fuselage.
If you are lucky, you can find a model on the internet which you can modify. However, if the model was not designed on Blender, it may not display correctly. In most cases, you will eventually replace the parts with parts that you create in Blender.
You can move, rotate and resize the shapes using the keyboard commands described above.
To edit points (vertices), edges and faces, you select the Edit mode. Select the appropriate icon in the lower left to edit points or faces. (I am not sure when you would ever want to edit an edge.) You can select all of the points or faces by pressing "A". You can deselect all of the points or faces by clicking in a blank area in the screen. (You will often want to do this before working on a new group of points or faces.)
You can select points or faces by either clicking on the individual point or face or using the mouse to select a group of them. If you want to select additional points, you can hold down the shift key. Once the points are selected, you can move, rotate or resize the points using the commands described above.
You can delete points or faces by pressing the Delete key. You can create a new face by entering the points mode, selecting 3 or 4 points and then pressing the F key.
 In Edit Mode with several points selected.
About 1/2 of the design process will involve finding and applying a texture to your model. Blender contains a special mode where you can map the texture to your model.
Blender also allows you to add animations to your model. These add realism to your model and you can also use them to avoid having to make time-consuming calculations in your program. For example, you can use animations to create a spinning propeller or to show aircraft pitch.
To create an animation, you will want to open an animation window. I generally use a range of 0 to 360 steps and insure that everything is zero at step 180. While there are fairly sophisticated ways to create animations in Blender, I use a very simple approach.
The first challenge is to move the pivot point of the part to the proper location so that it can act as a hinge. Generally, the axis will be in the center of the part. Where you have a flat part like a rudder or an elevator, you can do this by going into side view (for elevator) or top view (for rudder). Select edit mode and select option to edit points. Select all of the points by pressing A. Now you will move all the points backwards by pressing GY. The axis will stay put. Move the points until the axis is where a hinge would be located. Enter object mode and move the entire part forward by pressing GY. If the hinge or part is not aligned vertically, you can repeat the above process, pressing GZ instead.
Next you want to set the keyframes for the animation. Change your lower screen to a graph editor display. Move the marker on the graph to 150 and, in the 3D window, change the X rotation of your part to 24. Right click on the 24 and select "insert single keyframe". Move the marker to 0 and insert single keyframe. Now move the marker to 210 and change the X rotation of your part to -24. Right click on the 24 and select "insert single keyframe". Move the marker to 360 and insert single keyframe. Congratulations, you have animated your first part. If you move the marker on the graph back and forth, you will see the part move. One last step is to make the animation linear. In the graph editor display, right click on the graph line and select "interpolation mode". Select "linear". The graph line will now be a series of straight lines.
Models created in Blender will display backwards in three.js. You can avoid this problem by creating the aircraft in Blender with the nose pointing to the right in side view. If you have already created the aircraft using the Blender orientation, you can select all the parts (by pressing A), rotate them around the vertical axis by 180 degrees and apply the rotation. Alternatively, you can create a small dummy cube, attach the pitch cube to it and rotate the cube 180 degrees. Whichever method you use, you should make sure that all the parts have rotated properly and that your animations are still working correctly.
Exporting your model for use in a three.js program is fairly simple. Currently, three.js recommends that objects be saved in glb/gltf format. In most cases, you should use glb. This format combines the model and the textures into a single file. In contrast, gltf saves the model and textures separately. Using gltf makes sense if you are going to create several variations of your model that share textures.
To export your model, select "File" then "Export" the "glb/gltf 2.0". This will take you to a screen where you can select the target file location and enter the file name. In the upper right, you can select the model type: glb or gltf. I use the default values for the other items.
I also select "export modifiers" since that generally insures that any modifiers will be applied to the model. This was helpful in insuring that the models look right.
If you want to see the exported model, you should be able to use the standard 3D model viewer that comes with Windows. The viewer does not display the model perfectly and will tell you that there are errors. You can ignore those warnings. The model viewer also shows animations in the order that they are saved. This will be helpful when you want to load the animations in three.js.
There are also websites where you can validate or view your model by dragging and dropping the file onto the screen. These programs will tell your whether there are errors in the model. Here a couple of those websites.
| gltf Viewer | - gltf Viewer by Don McCurdy (view and validate) | |
|---|---|---|
| gltf Validator | - gltf Validator by Khronos (validate only) |
These websites can be trusted. Don McCurdy is one of the developers of three.js. The Khronos Group maintains the gltf standard.
Blender Guru has excellent online tutorials on modeling, especially if you like donuts. The tutorial on creating a coffee cup showed some techniques that I used in modeling an engine cowl. Here are some tutorials discussing how to make an airplane in Blender.
| Part 1 | - How to make an Airplane by Blender Guru | |
|---|---|---|
| Part 2 | - How to make an Airplane by Blender Guru |
However I would suggest that you not use the mirroring technique which he uses. If you do, be sure to select "export modifiers" when exporting the model to gltf.