
Giaros - An island in the Aegean Sea.
It turns out that making copies of real-world islands with Blender is fairly simple. This webpage shows the steps required.
The only step not mentioned is that, once you have created the mesh, you should click the "Apply" button to "bake in" the elevations. (Before doing so, I would suggest saving the Blender file in a safe place in case you want to make other changes in the future.)
You can obtain heightmaps from around the world from the terrain.party website. You want to download the "merged" heightmap.
You can obtain the real-world texture using Google or Bing maps.
You can use the heightmap to create a modified mesh. And you can use the texture in Blender to postion the mesh. You can export the mesh and texture together and load them into three.js together. However, this means that you will have to adjust the material settings within Blender to work with three.js. In our case, using the default settings created a shiny island, even with roughness set to the maximum.
Instead, we are recommending that you save the untextured mesh and the texture separately so that you can load them into three.js separately. The advantage of this approach is that you can use the texture as part of a three.js NodeMaterial and adjust the settings for metalness and roughness within three.js.
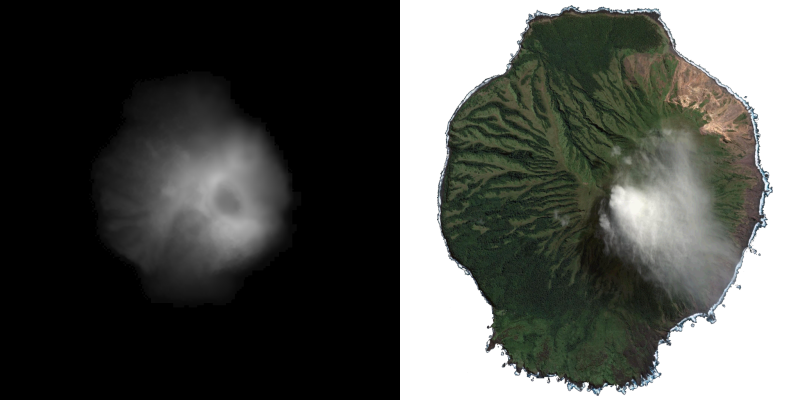 Here are the maps for Almagan, including the heightmap (left) and the texture map (right).
Instead of using transparent textures to create shorelines and floating the island above the water, we are now using non-transparent textures and manually adding shorelines and sinking the island into the ocean. We are using the powerful Blender decimate modifier to create smoother displays and shorelines.
To recap, here are the steps to creating and exporting a modified mesh:
- In the Layout Screen, add a grid mesh. (If you use a 1 meter X 1 meter mesh grid to represent a 1 km X 1 km grid and 1000 squares, then each sqaure will be 1 meter X 1 meter wehn you later resize the grid in your program.)
- Select Edit mode and select all faces (press A").
- Right click to select the Face options and select "Shade Smooth".
- In the vertical row of icons to the right, go to the Texture section (bottom icon) and open a new texture.
- In the Image/Settings subsection, open the heightmap.
- In the Image/Mapping subsection, select "Extend".
- In the vertical row of icons to the right, go to the Modifiers section and add a Displace modifier.
- Change the Strength to (e.g.) 0.25 and the Midlevel value to 0.
- Save the Blender file in a safe place in case you want to make additional changes in the future.
- Apply to modifier to "bake in" the changes.
- Open a Shader Editor panel at the bottom of the screen where you can edit your material shaders.
- In the vertical row of icons to the right, go to the Material section (second from bottom) and create a new material. Several shaders will appear in the Shader Editor panel
- Add an Image Shader, load your diffuse texture and link the color output of that shader to the color input of the Main shader.
- Go to the UV Editor to apply the material to your mesh - this creates the UV map that will be exported with your mesh.
- Select the option to export the mesh as a glb file.
- In the export screen, in the Matierials section select the option to not export materials.
// Import the GLTF/GLB Loader
import {GLTFLoader} from "three/addons/loaders/GLTFLoader.js"; // This needs to be imported separately

// Define the Loaders (These only need to be defined once)
let txtrLoader = new THREE.TextureLoader();
let gltfLoader = new GLTFLoader();

// Island Variables
let IslMsh = "https://PhilCrowther.github.io/Aviation/scenery/models/giaros.glb"; // Address of the Mesh
let IslTxt = "https://PhilCrowther.github.io/Aviation/scenery/textures/giaros.jpg"; // Address of the Texture
let IslAdr = 0; // Address of new Mesh
let IslSiz = 1000; // Multiplier
let IslVrt = -15; // Vertical Adjustment

// Somehwree in Your Program, Call the Loading Subroutine
loadObject(IslMsh,IslTxt,IslAdr,IslSiz,IslVrt);

// A Generalized Subroutine for Separately Loading Meshes and Textures and Combining Them.
function loadObject(msh,txt,adr,siz,vrt) {
    ObjTxt = txtrLoader.load(txt); // Load the texture
    let ObjMat = new THREE.MeshLambertNodeMaterial({colorNode: texture(ObjTxt)}); // Define the material (Node Material)
    gltfLoader.load(msh,function (gltf) { // If loading of mesh is successful, do the following:
        gltf.scene.traverse(function (child) {if (child.isMesh) child.material = ObjMat;}); // Add Material
        adr = gltf.scene; // Save new mesh
        adr.scale.setScalar(siz); // Resize the Object
        adr.position.set(0,vrt,0); // Adjust Vertical Position of Object
        scene.add(adr); // Make Object visible
    },null,null);
}
Notes (added 28 Sep 2025):
- We have now confirmed that the above approach still works with the current version of Blender (4.5).
- One problem we have had when starting Blender is that the Material icon appears at the bottom of the column of icons, rather than the Texture icon. To fix this problem select a page where the icon appears.
- Many sources indicate that you should use the make the displacement map part of your material definition. This does not work because you want to export the grid without materials. To do that, you need to uase a Displacement Modifier, as described above.
- In some cases, the heightmap does not match well with the texture. See the case study below for an explanation of how we handled this problem for one island.
- Finally, you will find that the placement of the texture is different in three.js than in Blender. This happens regardless of whether you save and load the textures separately or as part of the mesh. This means that you may have to use trial and error to edit your mesh in Blender in a way that does not match the texture.
While the process of creating an island is fairly straightforward, the greater challenge is finding a small uninhabited island that is well mapped. In general, the smaller the island, the worse the mapping. Many uninhabited islands are not even mapped. And if you are lucky enough to find a small well-mapped island, you will likely have trouble finding a good image. Even with Google or Bing, many of the images of these islands are substandard.
But, if you find one, the results are amazing. The shaded texture will make the map seem higher resolution. We captured the textures from Google maps at the 500 foot setting. To save space, we suggest using a texture which is 1024 X 1204 or 1024 X 2048 and which has 32k colors. This kept the size of the textured island to less than 1mb.
Giaros - An island in the Aegean, southeast of Athens.
The excellent shading greatly enhances the shape of the mesh.
In your simulation, be sure to align the island so that the shadows on the texture are away from the sun.
One you have found an island, you can make changes to the island. For example, you can resize the island. Or you can edit the mesh of the island to add a runway. However, if you plan to "harden" the island surfaces, you will want to minimize the changes to the mesh. This is because you will want to use the heightmap to define the elevation.
Almagan with a runway.
Our recent experience with updating our islands has led to make a couple of changes to our approach.
In the past, (as in the images shown on this page) we would use a transparent texture to show the details of the shoreline. Because transparent textures are "expensive", we would use only transparent textures along the shoreline. The use of transparent textures created problems when we added transparent smoke. We resolved this by setting a higher drawing order for the smoke and adding some special definitions to the transparent material. To avoid z-fighting, we would have the island float above the ocean, with the distance increasing as we climbed. One problem with this approach was that, because the mesh and texture did not always match, you could end up with gaps between the island and the ocean. That is what we were trying to fix when we started this process.
The first major change is that we are no longer using transparent textures. Instead, we are using solid textures and closely trimming the island mesh and sinking the island into the ocean. This makes the island part of the ocean because waves are now lapping against the island and onto the shore. To avoid gaps between the island and ocean, you will probably have to create a ring of grids around the island which slope downward several meters below the island. These are your beach. This approach eliminates the need to use transparent textures and the need to float the island above the ocean.
The second major change is the use of the decimate modifier in Blender. This enables you to create smooth shorelines, as discussed in the case study below.
Here is the homebase island, created using this new approach.
We had particular problems with the Giaros because the texture map did not match the displacement map. Normally, we have tried to display islands at sea level using a transparent texture. But the difference betwewn the maps created holes in the final display. We could have manually edited the grid. But, for some reason, the placement of the texture was different in three.js than in Blender. This meant that we has to use trial and error, a tedius process that often made things worse. So we decided to sink the island and use a non transparent map with a neutral background colot to fill in the gaps.
This worked well and the shoreline did not appear blocky as we had expected. Unfortunately, we discovered that the reason for the smooth shoreline was that we were using a much higher resolution grid than before. This resulted in extremely large export files that could have proved taxing to our GPU.
Before restarting the process, we looked to see if Blender had a modifier that could reduce the resolution. We discovered that Blender has a modifier, called the Decimate modifier which is used to reduce the resolution of objects. We used this, reducing the ratio until the exported mesh was back within the normal range. We applied the modifier and were surpised to find that, after this process, the shoreline was still relatively smooth, even at the lower resolution. When we examined the new object in Blender edit, we discovered that the orderly grid was gone. Instead, Decimate have moved everyting around for the purpose of smoohing out the rough edges.
Here is the final result. The island has been lowered about 15 meters and the waves are lapping against the side of the island.